Three Wheel
A localizer that uses three odometry wheels
Prerequisites
Ensure that three odometry pods are connected: two parallel to the length of your chassis and one perpendicular to the chassis. The left and right pods measure forward motion, while the strafe pod measures sideways motion.
The Three Wheel AutoTuner will ask for the HardwareMap name of the motor port that each odometry encoder is plugged into.
The default encoder names are:
- Left parallel pod:
lf - Right parallel pod:
rr - Strafe pod:
lr
The tuner also expects drive motors named lf, lr, rf, and rr to exist in the HardwareMap.
Common Mistakes
- Make sure the left and right pods are parallel to the robot's forward direction.
- Make sure the strafe pod is perpendicular to the forward pods.
- Enter the HardwareMap name of the motor port that each odometry encoder is plugged into.
- Make sure drive motors named
lf,lr,rf, andrrexist before running the tuner. - Move the robot by hand during every measurement. The tuner sets drive motor power to zero.
- Complete the requested motion, stop moving, and then press Stop to save the measurement.
- During offset and turn identification, rotate counterclockwise about the robot's center.
- Pedro uses +X forward, +Y left, and positive heading counterclockwise.
Automatic Tuning
The Three Wheel AutoTuner can automatically determine the values needed for your
ThreeWheelConfig, including encoder directions, encoder resolutions, pod offsets, and the
turn multiplier.
During the procedure, you will enter which motor encoder ports your odometry pods are plugged into, then move the robot by hand when AutoTune asks you to.
The tuner determines:
forwardTicksToInchesstrafeTicksToInchesturnTicksToRadiansleftEncoderDirectionrightEncoderDirectionstrafeEncoderDirectionleftPodYrightPodYstrafePodX
How to Run the Tests
For each test, press Continue, start the tuning OpMode, perform the requested motion, stop moving the robot, and then press Stop to save that measurement.
Do not drive the robot with the gamepad during these tests. Move it by hand.
Add the Tuner
Inside your Tuning class, add:
@Tuner
public static Procedure threeWheelTuner() {
    return new ThreeWheelTuner();
}
Make sure ThreeWheelTuner is imported:
import org.firstinspires.ftc.teamcode.pedro.procedures.ThreeWheelTuner;Build and send the updated code to the Robot Controller.
Open AutoTune
While connected to the Robot Controller, open the following address in your browser: http://192.168.43.1:10158
Select Three Wheel Tuner.
Encoder Setup
Enter the HardwareMap name of the motor port that each odometry encoder is plugged into.
For example, if your left pod encoder is plugged into the encoder port for a motor named lf
in your Robot Configuration, enter:
lfin the Left Encoder Motor Name field.
Do the same for the right and strafe pods.
The default values are:
Left Encoder Motor Name:   lf
Right Encoder Motor Name:  rr
Strafe Encoder Motor Name: lr
Change these names to match your robot, then press Submit.
Important
Enter the HardwareMap name of the motor whose encoder port the odometry pod is plugged into.
These are not separate HardwareMap names for the odometry pods.
Encoder Resolution Setup
Next, enter the distance in inches that you want to move the robot during the encoder resolution tests.
The default is:
48For example, if you leave the value at 48, you must move the robot exactly 48 inches during
each resolution test.
Enter the distance you want to use, then press Submit.
Measurement Tip
Measure the test distance as accurately as possible. Keep the robot straight during the forward pushes and avoid turning during the strafe push. Running the tuner multiple times and comparing the generated values can help identify inconsistent measurements.
Left Encoder Resolution and Direction
Press Continue, then start the tuning OpMode.
Push the robot straight forward by the exact distance entered during setup.
For example, if the distance is 48 inches, push the robot forward exactly 48 inches.
While the test is running, telemetry displays information including:
- Left, right, and strafe SDK encoder ticks
- Corrected encoder ticks
- Localizer X and Y
- Total heading
- The selected pod
- The measured movement
After the robot has moved the full distance, stop moving it and press Stop.
The tuner will determine the encoder resolution and direction for the left parallel pod.
Right Encoder Resolution and Direction
Press Continue, then start the tuning OpMode.
Push the robot straight forward by the same exact distance.
After the robot has moved the full distance, stop moving it and press Stop.
The tuner will determine the encoder resolution and direction for the right parallel pod.
The final forwardTicksToInches value is calculated using both parallel pod measurements.
Strafe Encoder Resolution and Direction
Press Continue, then start the tuning OpMode.
Push the robot straight to the left by the exact distance entered during setup.
After the robot has moved the full distance, stop moving it and press Stop.
The tuner determines:
c.strafeTicksToInches.set(...);
c.strafeEncoderDirection.set(...);
Coordinate Direction
Pedro uses +X forward and +Y left. During this test, move the robot to the left.
Left Pod Offset Identification
Press Continue, then start the tuning OpMode.
Rotate the robot exactly 180 degrees counterclockwise about the robot's center of rotation.
Keep the center of the robot in the same position as closely as possible.
After completing the rotation, stop moving and press Stop.
The tuner uses the measured parallel pod travel to calculate leftPodY.
Right Pod Offset Identification
Press Continue, then start the tuning OpMode.
Again, rotate the robot exactly 180 degrees counterclockwise about the robot's center.
After completing the rotation, stop moving and press Stop.
The tuner uses the measured parallel pod travel to calculate rightPodY.
Offset Validation
The measured leftPodY must be greater than the measured rightPodY. If the tuner aborts
at this step, verify the pod mapping and make sure both offset tests were rotated
counterclockwise about the robot's center.
Turn Multiplier Identification
Press Continue, then start the tuning OpMode.
Rotate the robot exactly 360 degrees counterclockwise.
Use a fixed reference point so the full rotation can be measured accurately.
After completing the rotation, stop moving and press Stop.
The tuner calculates:
c.turnTicksToRadians.set(...);The tuner also uses the offset-stage measurements together with the turn measurement to finish calculating:
c.strafePodX.set(...);Applying the Results
Once the tuner is complete, open the Java tab.
AutoTune will generate a complete ThreeWheelConfig using the values determined during the
tuning procedure.
The generated configuration includes:
- Left encoder name
- Right encoder name
- Strafe encoder name
- Left pod Y offset
- Right pod Y offset
- Strafe pod X offset
- Forward ticks to inches
- Strafe ticks to inches
- Turn ticks to radians
- Left encoder direction
- Right encoder direction
- Strafe encoder direction
The generated encoder names will match the HardwareMap names entered during Encoder Setup.
Copy the generated configuration into the ThreeWheelConfig in your Constants.java file.
Use the Generated Values
Use the complete configuration generated by the tuner for your robot instead of the example values shown on this page.
Manual Offset Tuning
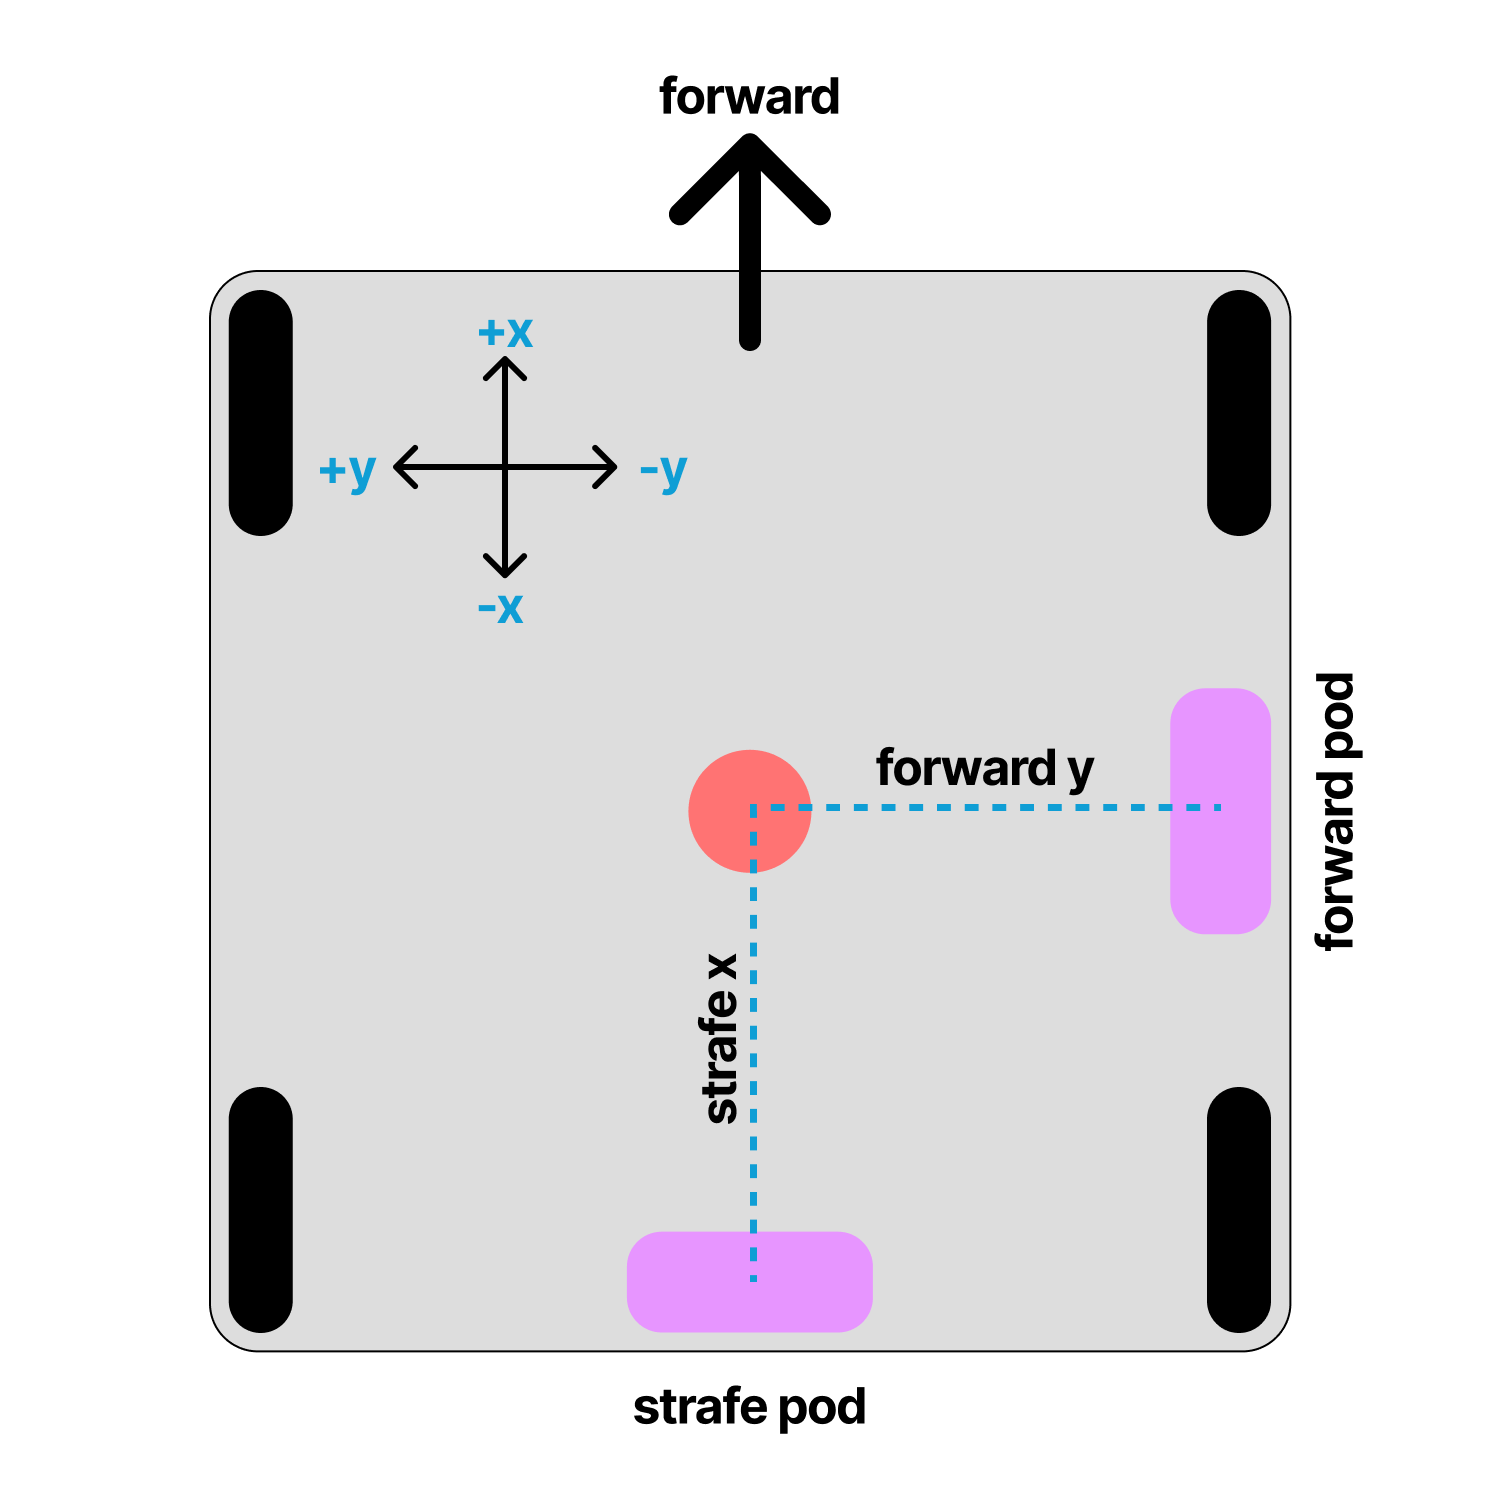
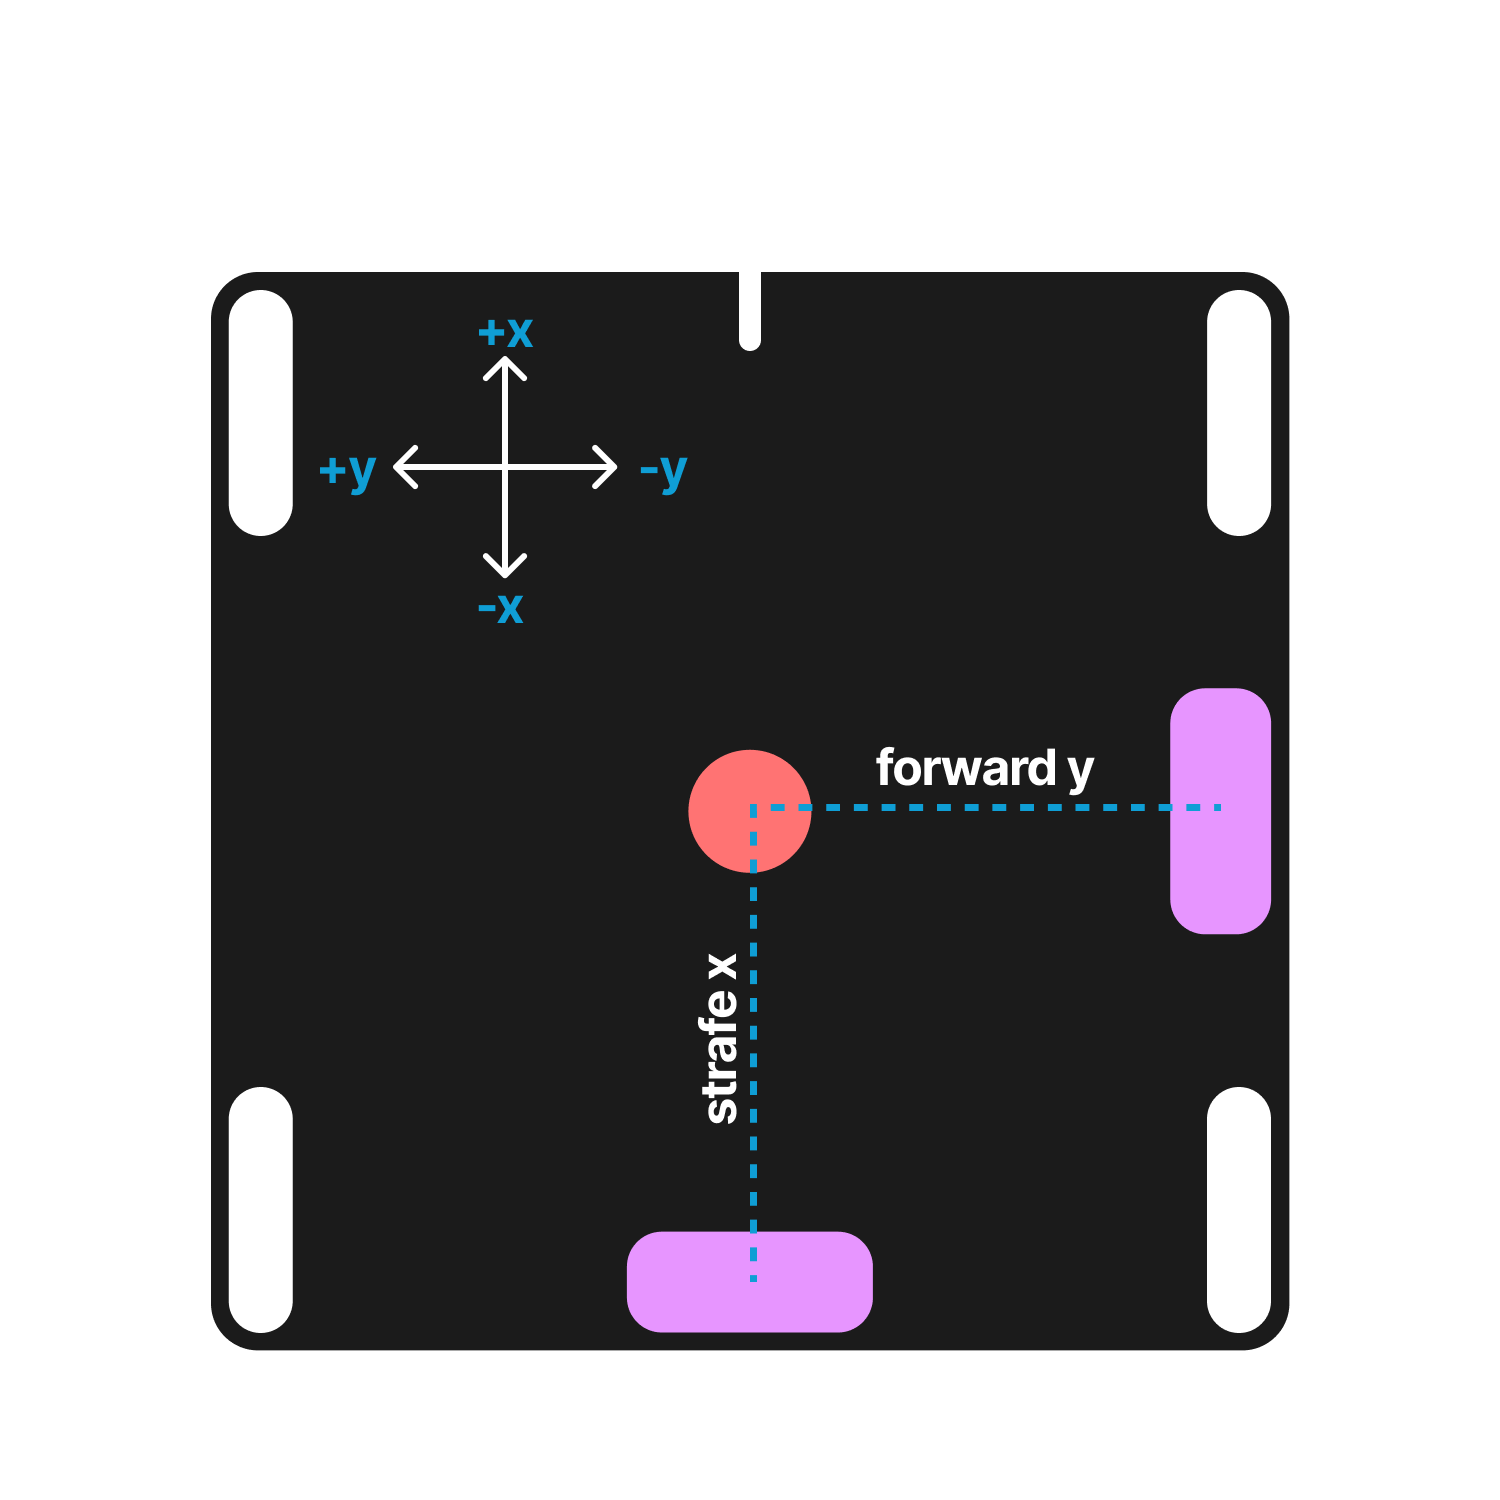
Offsets can also be found manually using the diagram below. Offsets are in inches.
Set your odometry pod offsets to define where they are relative to your robot's center of rotation.
Testing the Localizer
Once you have completed the tuning steps, test your localizer using the localization test.
Move the robot forward. X should increase.
Move the robot left. Y should increase.
Rotate the robot counterclockwise. Heading should increase.
If the reported motion does not match the physical robot motion, rerun the tuner and verify:
- The encoder mapping
- The requested push distances
- The counterclockwise rotations
- The generated encoder directions
Congratulations on successfully tuning your Three Wheel localizer!
Troubleshooting
If you have any problems, see the troubleshooting page.
Last updated on